Want to give your dingy-looking kitchen a new look? Most of the time, it merely a little makeover of the kitchen cabinets that’ll do the trick. When thinking about renovating their kitchen, the question that most homeowners want answered is how to glaze kitchen cabinets. And that’s what you’ll learn here.
You don’t need a professional to do the job, nor do you need much expertise to do it yourself. Even first-timers can do the job beautifully if they follow the guide.
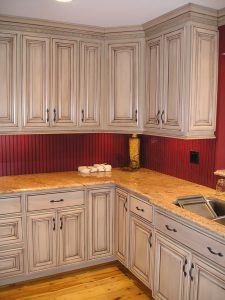
What is glazing, and why would you want it on your kitchen cabinets?
Glaze is a material similar to paint, which you apply over painted wood. Unlike paint, which absorbs and dries quickly over the wood, glaze stays wet for a long time so that you can adjust its positions easily with a paintbrush or rag. If something goes wrong, you can even wipe the entire thing off and start fresh.
So what’s the point of glazing? By glazing any wooden furniture, you can give it a more architectural and antique look. It adds detail to the sides and corners by darkening some regions more than the other. Overall, it provides the feel of real wood.

What will you need?
Coming back to our problem, glazing kitchen cabinet doors, here’s what you’ll need to begin the project.
- Screwdriver
- Rag
- Bucket
- Paintbrush
- Paint roller
- Paint stirrer or wooden stick
- Clear glaze or tinted glaze
- Oil-based paint
- Polyurethane
Steps you need to follow
With all the supplies ready for use, here are the steps you’ll follow to glaze your kitchen cabinets.
Step 1: Prepare the cabinets
- Remove everything from the cabinets and take out the drawers.
- It’s best to remove the cabinet doors as well using a screwdriver, but you can keep them in place if you want.
- Clean the cabinets with a rag. Use sponge and dish soap if required.
- Sand the drawers neatly and remove all sawdust with a dry rag.
Step 2: Paint the cabinets
Now, this step is entirely optional. If your cabinets are in good shape and the paint hasn’t faded, you can even skip this step and apply glaze to the existing paint. Most homeowners, however, prefer painting the cabinets fresh before applying the glaze.
If you opt for painting the cabinets fresh, it’s better to choose an oil-based paint since they stay in shape longer and work well with glazing.
- Use a paint roller to coat all the large surfaces of the cabinets.
- The corners and grooves that have are out after using the roller are to be coated with a paintbrush.
- Apply a second coat and also a third, if required.
- Wait for at least 24 hours to let the paint dry completely before going to the next step.
Step 3: Choose the glaze
Two varieties are available, clear glaze and tinted glaze. If you’re nervous or wish to save some time, you can purchase a tinted glaze from the store in the color of your choice. The color you choose should go well with the base color of the cabinets.
Many people prefer preparing their shade using a clear glaze and paint. The type of paint that you will select to combine with the clear glaze will be mentioned somewhere in the instruction manual available with the glaze. Since there are different types of glaze available, the requirements may vary.
Oil-based varieties and water-based varieties are available for glazing furniture. There isn’t much difference in the results they produce, but since oil-based glaze takes greater time to dry, you will have more time to work after their application. That’s why most users prefer this variety over the other.
Step 4: Prepare the glaze
If you’re using a pre-mixed glaze, there’s no preparation required at all. If, however, a clear glaze is being used, follow the steps to prepare glaze before learning how to glaze kitchen cabinets:
- Pour out the glaze and paint into a bucket. The ratio is entirely up to you, but the usual practice is to use four times as much glaze as paint.
- Use a wooden stick or paint stirrer to mix the contents of the bucket.
Step 5: Apply the glaze

Now comes the actual part: applying glaze to your kitchen cabinets. Here is what you do:
- Use a foam brush to apply a thin coat of glaze to one of the cabinet doors. Apply the coat in slow, circular motions.
- After about 5 minutes, wipe it using a clean cloth to remove any excess until you achieve the desired look.
- Repeat the steps for all the cabinets.
- For more prominent effects, you can apply an extra glaze coat to the corners and grooves. Doing so will make the results darker here and give an effect of natural shading.
Step 6: Seal it
After waiting another 24 hours for the glaze to dry, seal all the cabinets with a layer of polyurethane. This layer will seal all your hard work and protect it against elements. Your glazed kitchen cabinets will last much longer with the use of polyurethane.
Conclusion
Once you start the project and follow our guide, you’ll see that it doesn’t take an expert to complete the job beautifully. You can do the job just as well as a professional once you know precisely how to glaze kitchen cabinets.
It’s not a difficult task at all. And believe us, you’ll have lots of fun doing it! The sense of achievement once you have your glazed kitchen cabinets completed before you is in itself phenomenal. Only by adding this architectural touch to your kitchen cabinets, you can change the look of your entire kitchen and create a space you’ll love to work in.